Showing posts with label food. Show all posts

Thursday, August 18, 2011

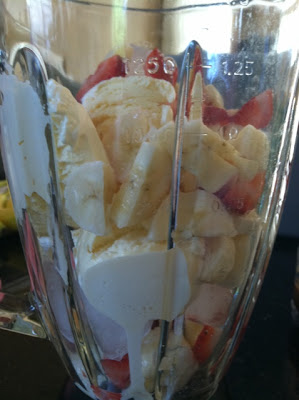
Strawberry Banana-Smoothies

YUM!

Strawberries.
Bananas.
Ice Cream.
Ice.

Best mix ever :)


All ya need is a couple strawberries, 2 banana's, 2 scoops of ice cream, & about 5-6 ice cubes.

Cut up the strawberries & bananas.

Toss it all in the blender.


And blend.
And blend some more.
Stop & stir a bit so that the fruit doesn't get stuck on the bottom and block the spinner thing.
Then blend again.


Eventually it will start to resemble a liquid.
That's when ya know it's ready.


Pour into some cups & enjoy.
I made this with the little sis and she couldn't get enough.
She actually finished hers & tried stealing mine.
It was that yummy.
And did I mention how simple it was.
Can you get an easier smoothie recipe?


So gather some fruit, toss it in the blender, & enjoy a summer treat before those hot days are over.

And for you workout peeps out there-just add some protein mix. That's what I did for the hubs, of course he wanted some peanut butter added too! (which was equally as delish)

Sunday, August 14, 2011

Easy-PEACHY-Sugary-Squezzy


Ok let me just start by saying how delicious are peaches? So incredibly a-mazing! I had 3 peaches hanging out in my fridge, that gasp...I forgot about!

And since last night my in-laws came over for some ice cream sundaes...which means I have leftover plain vanilla ice cream. (This is a rarity because the hubs only buys the yummy flavored kinds)

So I thought I would take what I had on hand and make some....

Sugar Fried Peaches

Whatch ya'll need to be on your way to melty goodness...

1 tbs butter
3 peaches (or more depending on how much ya wanna make)
2 tbs sugar (or more depending on how much ya wanna add to your waist)
2tbs brown sugar (or more depending on how much ya wanna add to your thighs)


First you want to peel a little bit of the skin off. Don't worry about getting all of it since the skin is a pretty yummy part. Cut the peaches up. Small or big-whateva's ya pleasure!

Then toss it in the frying pan, with the melted butter.


This is what it should look like after a minute or two of stirring over medium heat. You can leave them on as long as you want...just remember the longer they are cookin, the more the sugars will carmalize. Which I promise isn't so bad drizzled all up on that vanilla ice cream.


Of course the most important step! Taste test the *crap* out of the peaches. And if you are like me...learn to walk away for a minute so that you don't end up eating all of the peaches before they make it to the ice cream.


When you have had enough temptation, remove from heat. Scoop some ice cream & scoop some peach pieces on top. Then drizzle some of the sauce on that and dive right in! It was very difficult for me to snap a picture before I did the said "diving-in". You all owe me for having the will power to snap away instead of inhaling every last drop (by which I mean licking the bowl) Don't tell anyone, k? Specially the hubs. Don't need him knowing what a piggy I am when he isn't around or that I have now eatin all of the peaches and he won't even know I cooked 'em because he isn't home..oh man, I need an intervention.


So there ya have it. A 10 minutes cook job that will getcha ooey-goooey delicious sugar covered peaches that go great with ice cream. Or just straight out of the frying pan BOWL! I said bowl!

Wednesday, August 3, 2011

Taco Ring

Have I got the best recipe to share with you today?!?!

This is our all time favorite at my house. The hubs asks for it every week. And I'm always happy to oblige since we have Taco Tuesday every week. Yes we are that family..the ones who have theme nights. But only on Tuesdays, and only Tacos...so does that really count?

I'm not kidding when I tell you this is easy, fast, & so stinkin delish!


Here's what ya need:

*1 pound ground beef
*1 pkg taco seasoning mix
*1 cup shredded taco blend cheese
(or more if you are like me and like cheese)
*2 tsp. water
*2 pkgs refrigerated crecent rolls
(and you should get the same kind, not butter flake & original like I did. But these were what was in my fridge, so they had to work)
*sour cream
*taco sauce or salsa
*lettuce
*tomato, peppers, or onions (if you're into those veggies)


Here's how ya make it:

Cook your meat. Make sure it is fully cooked. Drain the grease.

Preheat your oven to 375 degrees.


In a bowl, mix taco seasoning mix, water, cheese, & cooked meat.
Stir, stir, stir until the cheese is a bit melted.


Open the crescent rolls and seperate. Begin laying them onto a baking stone.
I have a pampered chef stone that I love, love, love. But any stone will work.


When you are done laying out both packages of crescent rolls, it should look like this. No need to make it perfect (as you will see in my photos below that I clearly do not)


Begin scooping your meat mixture onto the crescent rolls. I use a cookie scooper to do this. It gives the perfect amount. Then I just go back and fill in where it is not full. Don't worry if some falls into the middle.


Fold points of the triangles over the meat filling and tuck under the base. This is where you can squeeze all the meat that fell into the middle into the tucked triangles.


Toss it in the oven. (for baby and me) (no, not funny...ok)


After 20-25 minutes it should be golden brown and that's when you know it's done.
Notice how half is real tight and half is real loose. The butter flake crescents are the ones that are real loose. Guess I know now to buy the original crescents!


How heavenly does that look? Perfect color!


I slice mine with a pizza slicer. It produces the perfect serving size. (or 2 if you are a piggy like me)


Put a dollop of sour cream, sprinkle some cheese, then cover with taco sauce. I usually use lettuce too, but I forgot to prepare some and M was starvin marvin so we didn't use any.
My mom likes to add the tomatoes, peppers, & onions at this point too.

I'm promising this is a crowd pleaser. I make this for appetizers when I need to prepare something for a get together. I just slice them in smaller pieces and then put all the fixings out in bowls around them.

Oh my now I think I need to go warm this up for my lunch. Time for heaven in my mouth!


Saturday, July 30, 2011

Penne Alfredo with Bacon and Broccoli

Here's another AMAZING recipe for you to add to your back pocket!

I'm talking serious yum!! And pretty simple! And it lasts for a very long time. As in I made this Tuesday and we are just now finishing the leftovers!! I love when meals(that are good) provide lots of leftovers!

I first found this on pinterest! What, you're surprised?


Penne Alfredo with Bacon and Broccoli


•1 pound penne pasta

•2 cups chopped broccoli (about 2 head) 
•5 slices bacon, diced

•1/2 cup (1 stick) butter
•1 cup heavy cream

•1 1/2 cups grated Parmesan cheese (not the powdery kind!)

•1/2 teaspoon garlic powder

•salt and pepper, to taste

•grilled chicken (optional) *Totally marinated mine in Italian dressing before grilling..yum*

Bring a large stock pot of water to a rolling boil. Boil pasta according to package directions.

While the pasta is boiling, fry the diced bacon until crisp. Add in the broccoli florets and cook, stirring occasionally, for about 5 minutes or until they are tender-crisp.

Meanwhile, in a small sauce pan, add the butter and heavy cream until heated through and butter is melted. Add in the Parmesan cheese, garlic powder, salt, and pepper. Stir until the cheese is thoroughly melted and sauce is a smooth, creamy consistency.
Drain pasta when done and add to a large serving bowl. Pour in the bacon and broccoli and toss it in with the penne. Pour the Alfredo sauce over top of the penne and stir until well combined.

Serve topped with sliced grilled chicken, if desired.


*I only used 1 head and it was still enough to get some in every bite*


*I swear by my Cutco scissors, so much easier than trying to cut raw bacon*


Doesn't that just look so delicious?

A little steam from the pasta never hurt a camara!

Sheer perfection in my tummy!

*Totally marinated my chicken in Italian dressing before grilling..yum*

And again I realize my pictures don't compare to the fabulous Karly but when ya camera is broke and all you have is the iphone, you have to make do! It's like making lemonade out of lemons...(hint hint M--I need a fancy shmancy camera so that I can take pictures of food! Ok?)

You should already be clicking over to her blog to print this recipe and then put in on the menu for this week. It's that good. I actually want to make it again this week. But wait that's why I did this in the first place, so that we could try new things instead of the same ol boring things every week. Wait, why are you still here? I told you to GO!!!

*I promise my chevron art piece is coming. I haven't had time to sit down and type up a post and I definitely want to give you all a good tutorial so hang on!!

Tuesday, July 26, 2011

It's dinner time..

So yesterday for our stay-at-home anniversary dinner we had steak, roasted red potatoes, and baked asparagus!

For the steak, M just seasoned them with salt, pepper, & garlic salt. We are simplists here, no fancy marinade for us. (Or that could be because M refused to buy any seasoning at the grocery store because he thinks the prices are outrageous.)

The potatoes were so simple and so yummy!
I forgot to take step by step pictures. Sorry!

I used red potatoes and sliced up about 5 or 6 depending on the size of them. Then I threw them in a bowl and used about all of the seasonings in my cupboard.

Pour a teeny tiny bit of EVOliveOil.
Dash of salt
Dash of pepper
Dash of italian seasoning
Dash of garlic salt
Dash of crushed red peppers
Dash of basil
and because I was feeling spicy..
Dash of cajun seasoning

Shake the bowl. A lot.
Grease up a cookie sheet and spread the potatoes in a single layer. Cook at 375 for about 25-30 minutes. Try flipping the potatoes every 10 minutes or so. Or at least move them around on the sheet.


I love the kind of potatoes that doesnt involve a huge pot, a masher, & my weak arm muscles.

For the baked asparagus..
Rinse in cold water and break of the ends. They will be somewhat brownish-red and oddly enough it will pretty much break at the perfect place every time!

Toss those babies in a ziploc bag and put in about 1 tsp of EVOliveOil.

Shake bag like crazy! I'm sensing a shaking theme for this dinner!
Lay them all out on a cookie sheet. (No need for greasing this one) Shake some salt and pepper on them. Bake at 375 for about 15-20 minutes. You want them to be tender but not flimsy. Make sense?


Don't these look delish?!?


And of course pour yourself some riesling to enjoy with your stay at home anniversary dinner! (The riesling that you send the hubby to get at the last minute when you realize all you have is water, milk, and chocolate wine that certainly won't taste good with steak & salt!)

Indulge in some chocolate lovers ice cream afterwards! And I'd call that a success!

Monday, July 18, 2011

Loaded Chicken & Potato Skillet

Today I tried out a loaded chicken & potato skillet recipe.

Let me tell you what.....YUM! It was so delish!

I of course found this little tasty thang on pinterest.
And of course it was originally from my favorite foodie blog.

I failed to take pictures of the process, so I'll be directing you to Mrs. Carroll for that part.

But I will tell ya where I added and didn't.

I didn't put any onions in mine. ICCCCK. The hubs & I are not fans of onions. Even if my mother in law thinks I should add them for flavor and then pick around them. No ma'am!

I also did not put in a yellow pepper. This is just my mistake, I forgot to get one at the grocery store!

My chicken was not as grilled as Mrs. Carrolls. M was home and starving after a round of golf in 90 degree heat, so I called the chicken good and didn't wait for it to grill. Still good though.

I added colby/monterrey jack cheese instead of just monterrey. I couldn't find just plain monterrey cheese that fit into my budget and ya'll know how small my grocery budget is so I just picked up a bag of mixed cheese. And believe me....it didn't make one bit of difference! Not that I've ever had my favorite foodie blogs version, so don't have anything to compare it to. But I'm saying it was fine!

So without further ado, here is my finished piece...


And here is Mrs. Carroll's version...
potatoskillet6

Notice her grilled chicken? Next time I'll have more patience and have mine looking like this. But for now mine will have to do and M says that this has to make its way to the dinner menu frequently!


On a side note...the homemade oreo cookies were a HUGE hit! M said never to make them again because he will have to purchase the next pant size up if I do. And the in-laws had these babies gone almost before dinner was served! I call that a success!

Sunday, July 17, 2011

Homemade Oreo Cookies

Get ready for a week of food!
I have grand plans to attempt some fancy meals I've been finding on pinterest and one of my favorite foodie blogs. I even went so far as to actually buy all of the ingredients! Now that's planning! I just recently switched over to grocery shopping every week in an effort to eat healthier and fresher. This new goal is very difficult, oddly enough, to keep under our budget. (use to be $100 for every 2 weeks, now it's $50 for every week) Don't know why it's harder to hit that goal now that I go every week, maybe I just need to rethink my planning and get used to only getting what I need for 1 week instead of 2.


I digress...back to the topic here. I know I have you all waiting to see just how awesome decent these homemade oreo's are. Now in most cases, people would show you the insperation picture first. Well....I'm not that gal today. I can't have you all thinking what a complete failure mine are compared to the awesomness known as Mrs. Carroll over at that favorite foodie blog of mine.

Ok there is the amazing blog that I love. But seriously do not click over there until the end of this post so you don't go comparing me to her. Cuz I just won't make the cut!


This is the final product. Serious...YUM! Perhaps...not the most appealing to look at!


This is my batter after oh about 10 minutes of mixing. Yes you read that correctly. 10 MINUTES PEOPLE! This is some crazy thick batter because you do not put any water in it. Therefore you should plan on skipping the gym this day and just get all your arm excercises in while mixing this batter!


Make sure to stop every few minutes and fold the batter over with a spatula so you don't miss any of the mix! Can't have dry mix pieces in our ooooey--goooey cookies!


Plan on doing this step a lot. Holy moly does this make a lot of cookies. I rotated 2 cookie sheets and I think I did a total of 6 or 7 times in the oven.


The filling is delish!!! However, here is where I went oh so wrong. As you will see from the amazing Mrs. Carroll's picture, her filling and my filling look absolutely NOTHING alike! What did I do wrong? Not sure...I used some tub butter instead of a stick, since I didn't have a stick. Maybe that was my downfall. Either way hers look like whipped actual Orea yummy filling. Mine looks like the thicker, knockoff version of melted butter. Hmmm, Mrs. Carroll..if you're reading this, tell me what's a girl gotta do to get mine looking as yumtastic as yours?


And here they are next to my pretty orange flowers. I have an entire plate more of these. Remember, I said it makes a whole lot of cookies!! I'm taking these to my in-laws for a cookout today (if my hubby doesn't finish them all first) Hopefully they are not a complete flop!

Now are you ready to be much more awed and amazed?

Here are the pictures from when my favorite foodie blog made hers...
homemadeoreos4
{via}

Yea, let's not make any funny comments, ok? My new little, domestic heart can't take it :)

All joking aside...do not make these if you plan on dieting. I told ya I wanted to eat healthier & fresher, then I go and make these!! See what pinterest does to me?!